
Compiler#
Remember that we have to translate our source code to machine code, to do this, we need to install a compiler.
- compiler
a computer program that translates computer code written in one language into another language
We will use clang compiler which is part of the LLVM project.
Installation#
Go back to the terminal in your editor.
Install it using:
brew install llvm
winget install martinstorsjo.llvm-mingw.ucrt
Go back to your editor’s terminal.
Check whether
clangis installed and available in our environment by entering the following command in the terminal of the editor:clangYou should see a message similar as follows:
clang: error: no input files
TroubleshootingIf
clangdoes not show the previous message andclangcannot be found, try the following in order:Uninstall all LLVM installations using Windows
Add/Remove programs.You can also use
winget, but we have the impression that some packages which were installed with administrator rights fail to be uninstalled when you try withwingeton a user terminal. Examplewingetcommand is:winget remove "LLVM MinGW (UCRT runtime)"
After you have uninstalled all LLVM installations, install the compiler again:
winget install martinstorsjo.llvm-mingw-ucrt
Now close and open your editor and try to compile again. Otherwise try other steps:
In this step, we will manually check whether
PATHenvironment variable is correct.First find where the compiler is installed. In Windows, the
martinstorsjo.llvm-mingw-ucrtpackage installs the executables includingclangunder the following path:C:\Users\YOUR_USERNAME\AppData\Local\Microsoft\WinGet\Packages\MartinStorsjo*\llvm-mingw-20*\bin
Note the
YOUR_USERNAMEand*placeholders, so do not copy paste but click through the folder using the file explorer.The directory path ending with
binmust be part of the path variable in your environment variables. To list and modify your path variable, refer to Editing the environment variable path.Probably you or your package manager modified your environment variable
path, but the editor is not aware of this. Close all editor windows and restart your editor.
Usage#
Now compile main.c using the following command:
clang main.c
You should get no output, which means your source code is compiled to machine code binary a.exe on Windows and a.out in Linux. You should see it in the EXPLORER column.
In Windows, if you get an error during compilation, check whether you have another version of LLVM installed in parallel, for example llvm.llvm in winget. You can list installed llvm packages using:
winget list llvm
If it exists, uninstall the package using its name, e.g.:
winget uninstall llvm.llvm
Alternatively you can also uninstall through Add/remove programs.
Configuring PowerShell for rendering special symbols#
This is only required in Windows.
On Windows, PowerShell is the default terminal shell software. PowerShell uses a different decoding than the usual UTF so useful symbols like çäæ😺 are not rendered correctly. To configure UTF support:
Start a PowerShell, e.g., using CtrlShift`
We will create a profile, which will be executed each time we open a PowerShell window. For security, Windows prohibits executing any scripts. To allow execution of local scripts execute the following on the shell:
Set-ExecutionPolicy -Scope CurrentUser RemoteSigned
The following creates the folders for the profile file and adds the configuration for UTF output.
mkdir (Split-Path -Parent $PROFILE) -Force
@"
[Console]::OutputEncoding = [Text.UTF8Encoding]::UTF8
"@ >> $PROFILE
Now restart your editor or close all terminals in your editor.
You can check the setting using:
[Console]::OutputEncoding
It should output:
BodyName          : utf-8
EncodingName      : Unicode (UTF-8)
...
Running your program#
On the same terminal, type the following to run your program:
./a.out
./a.exe
We need to prefix our program with ./, because your current directory (.) is not part of your path by design.
You should see the output Hello!👋.
If you do not see 👋 on the terminal, check Configuring PowerShell for rendering special symbols.
Creating and testing a task#
Typing each time commands to the terminal to compile and run our program is not necessary. The editor features tasks, which can use external programs. We will use tasks to compile our code – or build in general – within the editor and then to run our program.
Try to build your project using CtrlShiftb. You should see
No build task ro run found. Configure Build Task....Click on the last message. You should see
Create tasks.json file from templateand other menu items related to settings prefixed with the gear icon.
Select
Create tasks.json.... You should see different tasks templates includingOthers | Example to run an arbitrary external commandClick on
Others .....vscode/tasks.jsonwill be created and opened in a new tab. The template defines a task calledecho.Let us try to run the created template. The task
echois not a build task right now, so it cannot be run using the build task.To run the build task we could use the traditional menu items on the top. Instead, we will use the command palette, which makes it possible to search for a menu item.
Press CtrlShiftp. The command palette window should pop up.
Type
run taskand then selectTasks: Run Task. The window will show many tasks includingecho.Select
echo. A new window will show up withSelect for which kind of errors ... to scan the task output.Scanning the output is helpful, e.g. for:
directly jumping to the error in our source code.
to have an overview of issues in our code on the
PROBLEMStab (left to theTERMINALtab).
We are not going to use this feature, as we will directly get feedback about our program syntax mistakes on our editor window through the language server
clangdthat we will install later.Click on
Continue without scanning the task output. A new terminal window prefixed with 🛠️ echo should be opened and it will outputHello.Hellocomes from the shell commandecho Hello.If you don’t get the message, check whether you named your
tasks.jsoncorrectly. I once named ittask.json, which was not easy to spot.
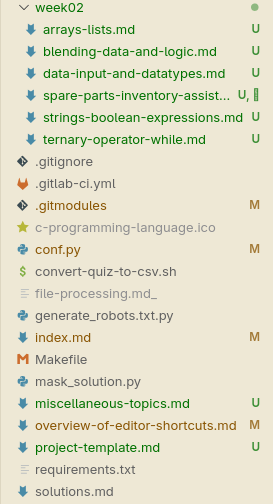
Fig. 1 An example of a cluttered documentation project (not C). Here, Markdown (*.md) files are the files I focus on when writing the course materials. Finding an *.md file under week02 is much more convenient than in the bottom where other files are blended in like *.py, *.sh, Makefile etc. Introducing a src folder would separate *.md files.#
Organizing source files under src#
Create a new folder called src in your project folder and move main.c in src folder. From this point on we will put the *.c files in there.
But why? In projects where we have only a single source file, this creates unnecessary directory complexity, so it may seem needless at first. We will introduce later other files like README.md, compile_flags.txt and even other source files (*.c) and header files (*.h) later. We don’t want the mix these files we will mostly use with other meta files, because working with in a project with many source files will be cumbersome as shown in Figure 1.
A project has usually meta files, which are not exactly project contents (in other words source files) but files about the project, e.g., project settings, README, compiler settings, license etc. So we should separate meta files from source files in a project with several files.
Setting up tasks for compiling & running our code using clang#
echo Hello in our current tasks.json does not compile and run our program. For compiling and running we have to tweak tasks.json.
We will set up two different tasks: build and run
Change the
tasks.jsonas follows:{ "tasks": [ { "label": "build", "type": "shell", "command": "clang", "args": [ "'@compile_flags.txt'", // `'` for Powershell "./src/main.c", "-o", "main" ], "group": { "kind": "build", "isDefault": true } }, { "label": "run", "type": "shell", "command": "./main", "group": { "kind": "test", "isDefault": true }, "dependsOn": [ "build" ], }, ], "version": "2.0.0", }
What is going on above?
We separated the compiler command from the arguments using
argsin addition.We need additional arguments to the compiler. Instead of writing all arguments in
args, we will introducecompile_flags.txt.@means that the following argument contains the file where the compiler flags will be read from.'single quotation marks are required to escape@symbol in PowerShell, because@has a special meaning.
The main reason for
compile_flags.txtis the language server clangd we will introduce later. Clangd can only read its arguments fromcompile_flags.txt. We will have the compiler arguments for clang and clangd in one file.We use
-o mainwhich sets our program’s name tomaininstead of./a.(out|exe).
in the
runtask, we usedependsOn, so that running theruntask always builds the project first.we set
buildas a build task, andrunas a test task, because, they are handled differently in VS Code. Moreover we set both tasks as default tasks in their group, which saves an additional click when we want to run these tasks.
Now save
tasks.jsonand createcompile_flags.txtwith the following content:-std=gnu2y -g -Iinclude
In this file we use:
-stdoption to clang, which stands for C standard.Clang uses and older but stable C standard called
gnu17as default. We want to try the latest C features in this course – hence the the option.Added
-goption, which generates additional information which can be useful in a debugging session
Run the
runtask by opening the command pallette (shortcut contains p) and searching fortest task. After running you should get an output similar to in theTerminal:* Executing task: clang @compile_flags.txt main.c -o main ...
Tip
The build task automatically saves your project files before running the task. Don’t lose time with saving your source files before executing the task.
Appendix#
clangd automatically compiles the project and populates
Problemstab, so there is no need forproblemMatcherintasks.json. Currently I don’t see any purpose for it, but in case there is, you can set it up as follows:"label": "build", // ... "problemMatcher": { "pattern": { "regexp": "^(.*?):(\\d+):(\\d*):?\\s+(?:fatal\\s+)?(warning|error):\\s+(.*)$", "file": 1, "line": 2, "column": 3, "severity": 4, "message": 5 } },
A problem matcher is built-in:
"label": "build",
// ...
"problemMatcher": ["$gcc"],
tasks.jsonalso supports OS specific properties. If you work in a project group or on multiple OSs, you can use thewindows,osx,linux:{ "tasks": [ { "label": "run", "type": "shell", "group": { "kind": "test", "isDefault": true }, "windows": { "command": "./a.exe" }, "osx": { "command": "./a.out" }, "linux": { "command": "./a.out" }, "dependsOn": [ "build" ], }, ], "version": "2.0.0", }