Appendix#
Manual download and install of the editor#
Go to vscodium.com/#install.
Click on
Download latest release. You will be redirected to the GitHub repository of VSCodium. You will see installation packages categorized in processor architecture, operating system and package type.Scroll to your processor architecture, e.g.,
x86 64 bits,ARM 64 bits.For Windows: download
User Installer.For macOS: download
.dmg.
Run the installation package. The default installation settings should work. When you finish the installation VSCodium should be launched.
Editing the environment variable path#

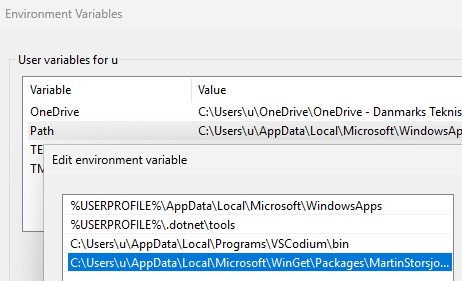
Fig. 7 The selected line shows the path created by winget install martinstorsjo.llvm-mingw-ucrt in the list of directories for Path.#
- environment variable
a user-definable value that can affect the way running processes will behave. Examples:
PATH,HOME,TEMPetc.PATHorPathin Windows is a list of directory paths. When the user types without providing the full path, this list is checked to see whether it contains a path that leads to the command.
To add the LLVM binary folder to the path of your environment to make its tools available on every command prompt:
Windows:
Open start menu and open
Edit environment variables for your account.Environment Variableswindow should pop up as shown in Figure 7.In
User variables for user, edit the variablePath.Click
New.Find the binary folder of the tool that you install and enter it, e.g.,
C:\Program Files\LLVM\binClick
OK.Edit environment variablewindow will be closed.On the
Environment Variableswindow, clickOK.
macOS: I could not test the following instructions
Open a terminal. A terminal should show up with the current working directory set to your home folder.
type:
open .zshrc
An editor should show up opening the configuration for
zsh, the default shell program in macOS.Modify path variable by prepending it with the path that you want to add. For example to add
/new/path:export PATH="/new/path:$PATH"
Save the file.
Warning
Changing environment variables like path does not affect running programs. Restart the programs which need to see the path change.
Why I chose VSCodium over VS Code#
Some popular VS Code extensions may only be used in VS Code, even their code is publicly distributed. This is bad for the open-source environment, so I tried to find alternatives to these extensions for this course. On top of this I used VSCodium, which does not have access to these problematic extensions from the beginning. Here I explain the details and other reasons for my decision.
This was a time-consuming decision for me, as I don’t want to confront beginners with political beliefs around open-source. At the same time, I profited significantly as a student from open source, because I could understand source code, play with it, use it and contribute to that for free. I want to teach tools that my students can use in the future. Of course open source has disadvantages and may not be always the sustainable solution. However, there are many sustainable open source tools and and I prioritize open source, if it is practical and relevant in future.
The significant difference between VSCodium and VS Code is that some popular extensions by Microsoft, e.g., for Python, C++ are not allowed in other editors like VSCodium, even the source code of the extensions are open source. I find that this creates vendor lock-in which may discourage competition, and force users to rely on Microsoft’s ecosystem. So I tried to find alternatives for this course which are truly open source.
Last but not least, VS Code sends usage data called telemetry as default, which can be turned off if you are not comfortable. Telemetry can be very useful for product development, but it should be opt-in in my opinion. In VSCodium telemetry is disabled.
You find a article that explains the problem of VS Code here.
Adding rules to Continue#
If the model misunderstands you, you normally react to that with another prompt. If the replies of the model are frequently hard to understand or not how you expect, you can define additional rules for the model behavior. As an example, let us make the model explain using analogies in domains which are familiar to you, e.g., cooking, playing the guitar, etc.
On Continue window, right above the prompt field, click on
(
Rules). The rules will open up. You will probably see the default rule calledDefault chat system message. The default message is sent every time you send a prompt.Click on
Add Rules. Continue will create the file.continue/new-rule.md.Edit it as follows
---
alwaysApply: true  # required due to the bug https://github.com/continuedev/continue/issues/6905
---

When explaining any concept, use analogies and metaphors from cooking.
Save the file.
Rename the file to
traits.mdOpen a new chat window. If you click on
(
Rules), you should see that the rulerules/traits.mdis active.Open code that you would like to have explained.
Use the prompt
explainand press AltEnter
I used the pi-estimator code and got following output:
… Imagine you’re baking a pie (pun intended) and you want to estimate the ratio of the filling to the crust. One way to do this is by randomly sprinkling small pieces of dough (representing points) onto the pie. If the dough lands inside the filling, you count it; if it lands on the crust, you don’t.
This code uses a similar approach, known as the Monte Carlo method …
Prompts can be used to create many kinds of tools — they are a superpower of LLM agents.
You can find more details about rules in Continue in their documentation
Superpower of custom prompts in LLMs#
Custom prompts let the LLMs adapt to many scenarios.
If you looked inside the Default chat system message of Continue, then you will also notice that these instructions form the output that you get in the window.
This is similar to the concept of system prompts in LLM agents. System prompts are default instructions which are processed by the LLM before you feed your instructions. For example you can browse the system prompts of ChatGPT here to get an idea.
The concept of prompting is a superpower, because you can build your own tool using a list of instructions. A collection of simple but useful prompts can be found here and another creative one that tests your understanding on a material using automated questions can be found here.
The situation where I understood the significance of prompts was the following: Once I changed the LLM model I was using in Continue. Suddenly I started getting wrongly formatted code output in the chat window which disabled direct editing of the file in Continue. It turned out that the output is a Markdown file and whether the tools shows the Modify file or New file button depends on the generated path in the reply. The agent was assuming that if a filename is given without any folder path (like main.c), then the file must be under src/, which led to the error. I had to add an additional rule which improved the output and fixed the problem. The default prompt of the Continue did not work for every LLM.
