Organizing code with repos#
In this section we will learn how to store our code on a repository primarily for keeping a diary about our work and sharing it. We will use GitHub.
- repository
(in context of version control systems) a data structure that stores metadata for a set of files or directory structure. The main purpose of a repository is to store a set of files, as well as the history of changes made to those files.
- version control
the software engineering practice of controlling, organizing, and tracking different versions in history of computer files; primarily source code text files, but generally any type of file.
Keeping a history of changes is helpful if we or someone else who also work in the project would like to understand changes in the project which is useful for collaboration. Keeping a history helps also to roll changes back if something does not work as intended.
Keeping projects in a repository is also helpful to collaborate and share code. You will use it later to share or submit your projects. You probably already downloaded something from the code forges GitHub or GitLab, on which most of the open source in the world is organized.
- code forge
a web interface to a version control system
Installing Git#
We will setup Git in VS Code now.
On the activity bar, click on

Source Control.Install Git using the package manager:
Windows:
winget install git.gitMacOS:
brew install git
On the editor
Source Controlwindow click onreload. The editor’s window will refresh and you will see other button on theSource Controlwindow.
Initialization#
Click on
Initialize Repository.Changeswindow will show up, which should show you the three files:main.ca.exetasks.json
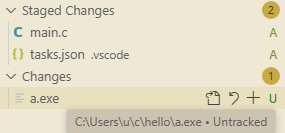
Fig. 1 Two added files (
A) and one Untracked (U) file on theChangeswindow. The mouse pointer hovers ona.exe, but the pointer cannot be seen.#You will see
Ubeside these files.Ustands for untracked, which means these files are not tracked by the repository. Typically only source files are tracked in a repository, so we will only trackmain.candtasks.json.To track these two files, hover on the filenames and click on the
 symbol on each. You will an
 Aon the right of the files, which stands for added.Click on the
Messageprompt to write a commit message. When we use repositories we make our changes in commits.Ideally each commit should be a set of changes that adds one or many describable feature like improved user name handling or added robot program. The advantage is that the programmer can roll back changes if these features led to problems later. Sometimes people don’t want to put so much structuring work and use a repository as a diary and commit code at the end of the day, which is not a good practice in a professional environment.
This is our first commit, so use the message
initial.Click on

Commit. You will see your first commit on theGraphwindow below.
- changeset
list of differences between two successive versions in a repository
- commit
the operation of committing such a changeset to the repository
Pushing code to a code forge#
The repository we used is until now local to our computer. To share our work, we must push our changes for a code forge like GitHub.
On the
Graphwindow, click on
Publish Branch. A confirmation window will pop up to sign in using GitHub.Allow. A new window will pop up with authentication code.Copy & Continue to GitHub. A new confirmation window will pop up.Open. A browser window will pop up.Create (if you don’t have an account) and login to GitHub. You will be forwarded to the
Device Activationpage on GitHub.Paste your code.
Authorize Visual Studio Codeshould come up.If the code is not available anymore, go back to the editor and start from step 1.
Click on
Authorize Visual-Studio-Code. You should seeCongratulations…You can close the browser.
A window will pop up with two options — whether you want to publish privately or publicly. You will use this repository to submit your work, so: select
Publish to GitHub public repository ...You will get the notification
Successfully published ....If you missed the notification, click on the
 (bell) icon in the below right corner of the editor.
On the notification, click on
Open on GitHub. A confirmation window will pop up.Click on
Open. Your browser will pop up and show you your repository on the GitHub.Use this address to share your work in general. If you want to submit for an assignment, use another address. This will be shown later below.
Adding a README on GitHub#
When we share work, we should also write some information about what the code is about in the README file.
On the repository page on GitHub, click on
Add a README.You can write something along the lines of:
# Hello

An example program for my C programming course.
Click on
Previewto see how this text will be rendered.Commit changes....Commit changeswindow will pop up.You can leave the automatic commit message.
Commit changes. You will be forwarded to your main repository page.
Synchronizing repositories on the code forge and local computer#
We made changes on GitHub, which are not visible on the repository on our computer. Remember that repositories are also used for collaboration, so if you are working in group, a code forge can also be used to synchronize the work between collaborators.
You can close the browser.
On the editor, you should have a notification about:
Would you like ... to periodically run "git fetch"?.This setting (
git.autofetchin settings) will automatically get the project updates from the code forge. This is useful when we collaborate or edit our code on different platforms, e.g., local computer, web-based IDE or on the code forge like we did. We will turn this feature on later, when you will write code in a group project, because manually getting the changes is often more efficient when working solo. So clickNo.On the
Graphwindow (belowChanges), click onPull . On the same window, the commit that you have done should pop up and your files will be updated.
Getting the link for submitting work#
Each commit is like a snapshot of your project. In metaphorical words, you take a photo of your project in each commit and this photo does not get lost. Each commit receives an individual numerical id which will show the snapshot state. Always use the link to a commit on the code forge to submit your work and not simply the repository link. You can get the link as follows:
On the
Graphwindow, right click on the commit that you want to submit. A menu should pop up.Click on
Open on GitHub. A confirmation window should pop up if you did not trust the domaingithub.combefore.If so, then click on
Configure Trusted DomainsandTrust https://github.com.Your browser will pop up and show you the changes that happened in this commit that looks like this:
...
Commit 38eab06
  goekce authored ...
Here
38eab06is the short commit id.You can copy the URL in your browser, which should look as follows:
https://github.com/goekce/hello/commit/38eab06d55a673d287c496134f960f944e4d4153
By submitting the commit link you can continue working on your project. Moreover it will be a proof that you submitted your work before the deadline and are fair to other students.